Anyone who knows me know I tend to take things a bit to far and sometimes over complicate thing for no apparent reason, especially when it comes to technology. This post is TOTALLY about that.
If you are not aware, a lot of people have been dumped into a graduate level course in working from home. Normally, I'm totally cool with working from home from time to time as it let's me get tasks done which require large blocks of time, but full time is a different story.
There were a couple of projects I was working on which require physical access to the campus network and I would have had to put them on hold while working from home. Well, I saw this time as a great time to work on these projects while no one was going to be bothering me.
So...I came up with a solution to provide L2 access to a couple of VLANs located at my desk. This is something I've wanted to tackle for a while now, but the circumstances forced me to make it happen. Along with that, I've been wanting to play with WireGuard for a bit, and this gave me the oppertunity to do so.
So...Let's get started!
Design Overview
From a super high level, the goal is quite simple: tunnel layer 2 traffic over a encrypted channel. But when you get down to it, it gets a bit complicated pretty quickly. Here is a diagram of the architecture:
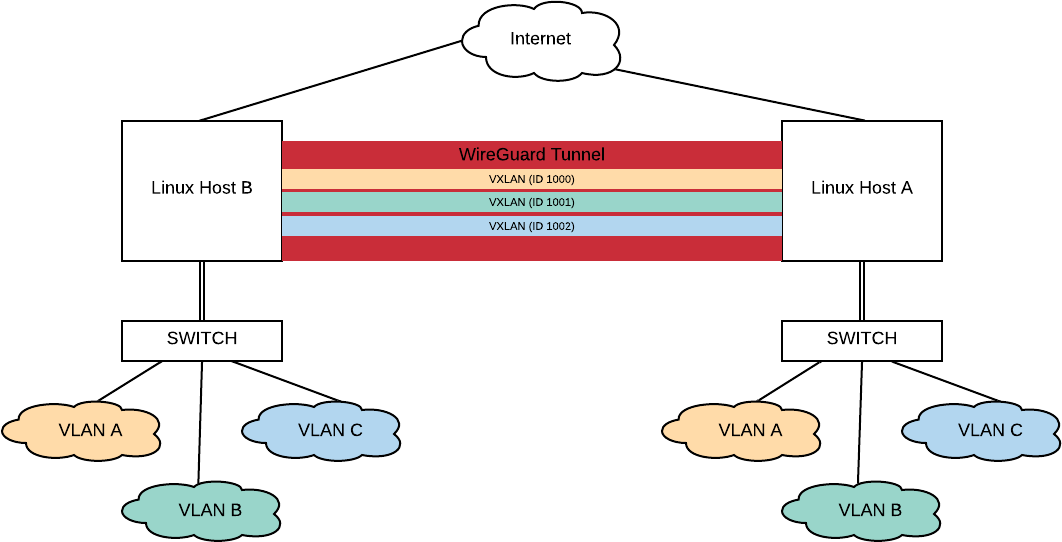
Overview of the topology
To accomplish the goal, I went with a WireGuard point-to-point VPN tunnel, and then run point-to-point VxLAN tunnels over the VPN tunnel. This provided for a pretty simple model to understand, but there are a lot of moving pieces which have to be thought about.
The setup I'm using uses two CentOS 7 boxes to be used as end points along with a managed switch on other side for breaking apart the VLANs. The Linux boxes I used have two ethernet ports on them which makes the setup much easier to work with, especially remotely.
So...Let's run through the different parts of building this!
The Setup
For going through the setup, I'm going to break it down by the different technologies I used to make this happen.
First up....
Setting up the VLANS
Before we start anything, we are going to need a trunk port to the switch, and a bunch of interfaces for the different VLANs. To do this, we can use the ip command:
ip link add link eth0 name eth0.8 type vlan id 8
ip link set link eth0.8 up
This will give you a virtual interface on VLAN 8 through the physical interface eth0. Please note by adding the interface via the command line, it will be removed upon reboot. For my installation, I created a networking script to bring up the virtual interface on boot:
TYPE="Ethernet"
DEVICE="eth0.8"
ONBOOT="yes"
VLAN=yes
NM_CONTROLLED=no
BOOTPROTO=none
IPV6INIT=no
IPV6_AUTOCONF=no
IPV6_DEFROUTE=no
IPV6_FAILURE_FATAL=no
A virtual interface will need to be created for each VLAN you are looking to extend with VxLAN.
Linux Bridges
Bridge interfaces provide a mechanism for connecting multiple layer 2 interfaces together. These will be used for moving the traffic between the VxLAN tunnel and the virtual interface.
To create the bridge, we can do the following:
ip link add br-vlan8 type bridge
ip link set br-vlan8 up
This will created the bridge and bring it up. My network script for this is:
DEVICE="br-vlan8"
BOOTPROTO="none"
ONBOOT="yes"
TYPE="Bridge"
NM_CONTROLLED="no"
ZONE=bridges
While bridge interfaces move layer 2 traffic, they can also be layer 3 interfaces. While this isn't a problem with IPv4, IPv6 it can be an issue if you are using SLACC. If you don't want your bridge to pick up an IPv6 address from any RAs passing across it, you can add the following to your /etc/sysctl.conf:
net.ipv6.conf.br-vlan8.autoconf = 0
net.ipv6.conf.br-vlan8.accept_ra = 0
This will have to be added for each bridge.
I also ran into an issue where my bridges were not passing traffic for one of my Linux hosts. Turns out they were running different versions of EVERYTHING, but easy to fix. In newer verisons of the kernel, traffic being passed across the bridge is subjected to the netfilter. This can be disabled with the following in the /etc/sysctl.conf:
net.bridge.bridge-nf-call-arptables = 0
net.bridge.bridge-nf-call-iptables = 0
net.bridge.bridge-nf-call-ip6tables = 0
We now need to add the virtual interface to the bridge. This can be done manually with the ip link command:
ip link set eth0.8 master br-vlan8
The following line can be added to the network script to handle this at start up:
BRIDGE=br-vlan8
The WireGuard VPN Tunnel
I'm going to be super up front regarding WireGuard: I'm super new to it, and still wrapping my head around it all. SOOOO...if I miss speak, let me know and I'll be more than happy to correct it.
I wanted to wrap my VxLAN traffic up some sort of encryption as some of the stuff I was going to be working on involves clear text traffic and is normally contained solely within the campus internal network.
WireGuard is a pretty bare bones VPN which is designed to be simple and fast while using state of the art cryptography. It uses native interfaces with in the OS, which means you can do some super cool stuff...but that will probably be a different post...someday.
To setup up the interfaces, I did the following:
ip link add wg-to-b type wireguard
ip link set wg-to-b mtu 1600
ip addr add 192.168.10.128/31 dev wg-to-b
ip link set wg-to-b up
The first command creates the interface. Pretty straightforward. You are able to name the interface what ever you want. If you haven't noticed, I have some prefixes I use for quick gancing and knowing what I'm dealing with.
Setting the MTU on the interface is very important. If you aren't familiar with VxLAN, it's basically wrapping a L2 packet inside of a UDP packet. Normally on a physical infrastructure we would increase the L2 MTU of all the infrastructure links to accomidate the larger packets, but sadly I can't change the MTU of all the links between my two sites. So...we increase the MTU of the VPN link it self. WireGuard does a very nice job with managing this, and breaks up the larger packets for us for transmission. A+ WireGuard!
We are going to need an IP address for the interface, so we add that. Then we bring it up.
Now...it's time to configure the VPN tunnel itself! On each box, we run the following:
# wg genkey > priv
# wg set wg-to-b private-key ./priv
# wg
interface: wg-to-b
  public key: gFZulLCPrerpOWZ6cL51riyq7scLvgn2D/+w/npcyV4=
  private key: (hidden)
  listening port: 52001
WireGuard uses private and public keys for the encryption and to authenticate enpoints. This associates a private key with the WireGuard interface. On the other host, we can add the configuration to the interface:
# wg set wg-to-a \
   peer gFZulLCPrerpOWZ6cL51riyq7scLvgn2D/+w/npcyV4= \
   allowed-ips 0.0.0.0/0 \
   endpoint [2607:f470:2:1:1111:3333:5555:7777]:52001
# wg
interface: wg-to-a
  public key: WXgGO1zfFtLNS6ysGlk5C2Ku6SKi+GTTlXQXaZ351nE=
  private key: (hidden)
  listening port: 39594

 peer: gFZulLCPrerpOWZ6cL51riyq7scLvgn2D/+w/npcyV4=
   endpoint: [2607:f470:2:1:1111:3333:5555:7777]:52001
   allowed ips: 0.0.0.0/0
This will configure WireGuard to connect. The same will need to be done on the opposite site.
I'm setting this up over IPv6 addresses as they are stable and don't pass through NAT. As Verizon FIOS doesn't have native IPv6, this is being done over with the HE IPv6 Broker service.
Once both sides are configured, you can use the wg command to see if everything is connecting and be able to ping between the endpoints.
Do remember you will need to open up the firewall to allow the WireGuard traffic through. I also had to add the WireGuard interface to firewalld and explictally allow traffic between the two end points.
VxLAN - The Final Tunnel
For those keeping count at home, there are already two established tunnels (IPv6 over IPv4 and the WireGuard). Time for our final tunnel: VxLAN tunnels
For those not familiar with VxLAN, it's an tunneling protocol which wraps layer 2 frame into a UDP packet at layer 3. It's a very handy thing for task such as these. Most of my expirence with VxLAN has been in the data center, but this is going to be a much smaller setup. By nature, VxLAN is point-to-multipoint setup requiring multicast and the such. For this setup, I'm going to use it as point-to-point and eliminate the need for multicast.
There is native support of VxLAN within CentOS 7 so I'm going take full advantage of it. We find ourselves back at the ip command to set everything up:
# ip link add vx-vlan8 \
    type vxlan \
    id 8 \
    remote 192.168.10.128 \
    dev wg-to-b
# ip link set vx-vlan8 master br-vlan8
# ip link set vx-vlan8 up
# ip link show vx-vlan8
8: vx-vlan8 <BROADCAST,MULTICAST,UP,LOWER_UP> mtu 1550 qdisc noqueue master br-vlan8 state UNKNOWN mode DEFAULT group default qlen 1000
    link/ether 0a:3f:db:78:2d:f3 brd ff:ff:ff:ff:ff:ff
The first command creates the VxLAN interface and configures it. The ID is like the 802.1q tag, it has to match on both sides. The remote and dev should be updated approriately for each side.
As we want to move layer 2 traffic, we need to make sure the VxLAN interface is apart of the bridge. Then we bring it up!
It is important to make sure the VxLAN interface has an MTU of the VxLAN interface is at least 1522 bytes. I made sure mine where 1550 to just be sure.
At this point in the game you show be able to pass traffic between the two sides!
Some Troubleshooting Tips
There are a couple of things I wanted to share for troubleshooting. I hope they are helpful.
tcpdump
tcpdump can be a very helpful tool to be able to see what is going on at all points in the chain. If you use the -i you can look at the traffic passing through each interface including the bridge (very useful for doing taps...again another post...at some point).
bridge
The bridge command is useful for looking at the forwarding table of the bridge you setup. It's really helpful for seeing if MAC addresses are being learned.
# bridge fdb show dev br-vlan8
33:33:00:00:00:01 self permanent
01:00:5e:00:00:01 self permanent
33:33:ff:f7:53:07 self permanent
Final Thoughts
Like I said at the begin, probably an overly complex setup, but it's provided some interesting insight into the different technologies and how Linux handles them. More importantly, it will let me do some work without having to bulid out a test environment.
Knowing more about the VxLAN support in Linux I think will be helpful in the future, and could open up some interesting avenues for troubeshooting and collecting traffic in the future.
The WireGuard is very interesting and I'm looking forward to playing with it more, especially with namespaces in Linux. I already have a couple of ideas on how to use that.
Somethings I want to further explore following this project:
- VLAN support on bridges
- On boot startup of WireGuard
- Doing EVPN with a software BGP and native VxLAN
Until next time!